建立基本的SpringBoot项目
创建一个maven项目,在pom文件继承依赖
1
2
3
4
5
| <parent>
<groupId>org.springframework.boot</groupId>
<artifactId>spring-boot-starter-parent</artifactId>
<version>2.7.8</version>
</parent>
|
在pom中添加SpringBoot依赖
1
2
3
4
5
6
7
8
9
10
11
12
13
14
15
16
17
18
19
20
21
22
23
24
25
26
27
28
29
30
31
32
33
34
35
36
37
38
39
40
41
42
43
44
| <dependencies>
<dependency>
<groupId>org.springframework.boot</groupId>
<artifactId>spring-boot-starter-web</artifactId>
</dependency>
<dependency>
<groupId>org.projectlombok</groupId>
<artifactId>lombok</artifactId>
<optional>true</optional>
</dependency>
<dependency>
<groupId>org.springframework.boot</groupId>
<artifactId>spring-boot-starter-test</artifactId>
</dependency>
<!-- 实现Spring项目的热部署-->
<dependency>
<groupId>org.springframework.boot</groupId>
<artifactId>spring-boot-devtools</artifactId>
<optional>true</optional>
</dependency>
<!--数据校验依赖-->
<dependency>
<groupId>org.springframework.boot</groupId>
<artifactId>spring-boot-starter-validation</artifactId>
</dependency>
<!--spring-boot和mybatis-plus整合的jar-->
<dependency>
<groupId>com.baomidou</groupId>
<artifactId>mybatis-plus-boot-starter</artifactId>
<version>3.5.3</version>
</dependency>
<dependency>
<groupId>com.mysql</groupId>
<artifactId>mysql-connector-j</artifactId>
<scope>runtime</scope>
</dependency>
</dependencies>
|
新建SpringBootApplication.java运行类,添加@SpringBootApplication注解
SpringBoot全局配置文件
1
2
3
4
5
6
7
8
9
10
11
| application.properties
server.port=8080
server.servlet.context-path: /toutiao2023
application.yml
server:
port: 8899
servlet:
context-path: /toutiao2023
|
SpringBoot自定义配置
1、在SpringBoot工程中,使用@ConfigurationProperties注入基本属性url、username、password、email、数组属性userList、Map属性pass,通过validation对email属性的值进行验证;
2、使用@Value注入属性uploadPath,使用SpEL表达式注入属性值;
1
2
3
4
5
6
7
8
9
10
11
12
13
14
15
16
17
18
19
20
21
22
23
24
25
26
27
28
29
30
31
| @Component
@ConfigurationProperties(prefix = "prop")
@Data
@Validated
public class Prop {
private String username;
private String password;
private String users[];
private Map passes;
@Email(message = "邮箱格式错误!")
private String email;
@Value("${upload.path}")
private String uploadPath;
@Value("#{5*6}")
private String result;
}
application.yml
prop:
userName: jerry
pass_word: 123456
users: [tom,jack,tough]
passes: {tom: 123,jack: 456,tough: 789}
email: yunfree163@163.com
upload:
path: E:\ServiceFile\
|
3、在SpringBoot工程中,使用@PropertySource读取自定义配置文件属性
4、使用@Configuration编写自定义配置类;
1
2
3
4
5
6
7
8
9
10
11
12
13
14
| @Configuration
@PropertySource("classpath:test.properties")
@ConfigurationProperties(prefix = "info")
@Data
public class MyProp {
private String user;
private String pass;
}
test.properties
info.user = monica
info.pass = 1234
|
SpringBoot多环境配置
1
2
3
4
5
6
7
8
9
10
11
12
13
| 1、在SpringBoot工程中,进行多环境配置,在多个配置文件中使用不同的端口号;
2、在全局配置文件中激活对应的配置文件,
源代码:
application.properties
spring.profiles.active=test
application-test.properties
server.port=8888
application-prod.properties
server.port=9999
|
SpringBoot存储静态文件在本机配置
1
2
3
4
5
6
7
8
9
10
11
12
13
| upload:
path: E:\ServiceFile\
oldPath: C:\Users\yunfree\Pictures\toutiao\uploadFile
mvc:
static-path-pattern: /pic/**
web:
resources:
static-locations: file${oldPath}
|
Mybatis-plus自动生成代码
Mybatis-plus代码生成器,生成Controller、Service、Mapper、Model代码;
依赖
1
2
3
4
5
6
7
8
9
10
11
| <dependency>
<groupId>com.baomidou</groupId>
<artifactId>mybatis-plus-generator</artifactId>
<version>3.5.3</version>
</dependency>
<dependency>
<groupId>org.apache.velocity</groupId>
<artifactId>velocity-engine-core</artifactId>
<version>2.3</version>
</dependency>
|
生成配置启动代码
1
2
3
4
5
6
7
8
9
10
11
12
13
14
15
16
17
18
19
20
21
22
23
24
25
26
27
28
29
30
31
32
33
34
35
36
37
38
39
40
41
42
43
44
45
46
47
48
49
50
51
52
53
54
55
56
| public class UserGenerator {
public static void main(String[] args) {
List<String> tables = new ArrayList<>()
tables.add("user")
tables.add("chatmsg")
tables.add("comment")
tables.add("kind")
tables.add("article")
tables.add("picture")
tables.add("log")
FastAutoGenerator.create("jdbc:mysql://localhost:3306/toutiaodb","root",
"123456")
.globalConfig(builder -> {
builder.author("yunfree") //作者
.outputDir(System.getProperty("user.dir")+"\\src\\main\\java") //输出路径(写到java目录)
//.enableSwagger() //开启swagger
.commentDate("yyyy-MM-dd")
.fileOverride()
})
.packageConfig(builder -> {
builder.parent("org.yunfree")
.moduleName("toutiao2023021")
.entity("model")
.service("service")
.serviceImpl("serviceImpl")
.controller("controller")
.mapper("mapper")
.xml("mapper")
.pathInfo(Collections.singletonMap(OutputFile.xml,System.getProperty("user.dir")+"\\src\\main\\resources\\mapper"))
})
.strategyConfig(builder -> {
builder.addInclude(tables)
.addTablePrefix("p_")
.serviceBuilder()
.formatServiceFileName("%sService")
.formatServiceImplFileName("%sServiceImpl")
.entityBuilder()
.enableLombok()
.logicDeleteColumnName("deleted")
.enableTableFieldAnnotation()
.controllerBuilder()
.formatFileName("%sController")
.enableRestStyle()
.mapperBuilder()
.enableBaseResultMap() //生成通用的resultMap
.superClass(BaseMapper.class)
.formatMapperFileName("%sMapper")
.enableMapperAnnotation()
.formatXmlFileName("%sMapper")
})
//.templateEngine(new FreemarkerTemplateEngine()) // 使用Freemarker引擎模板,默认的是Velocity引擎模板
.execute()
}
}
|
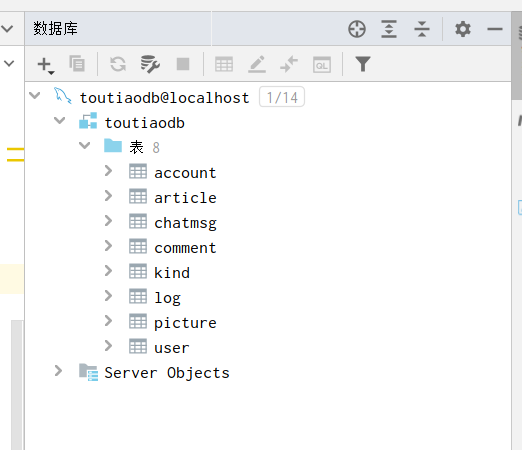
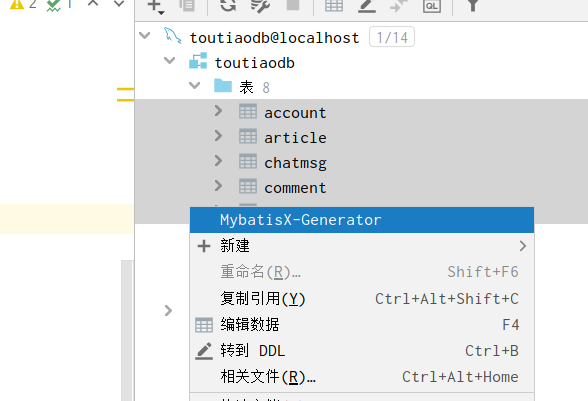
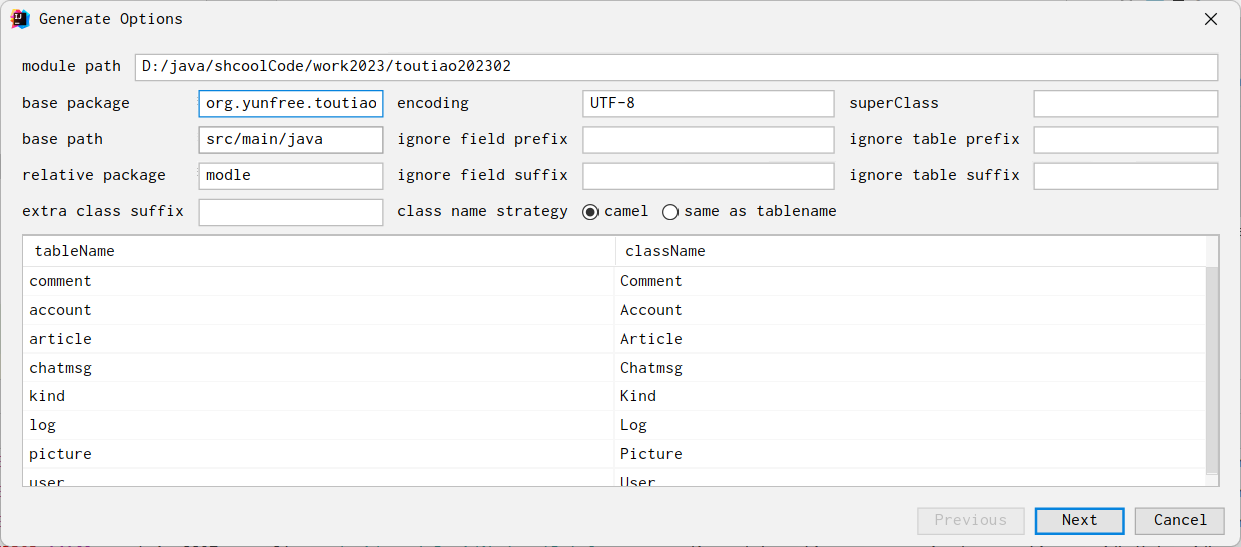
MyBatisX插件生成 Service、Mapper、Model代码;
在idea中连接数据库

选中需要生成的数据库表,右键生成

修改相应配置点击生成

SpringBoot配置德鲁伊druid连接池
配置信息
1
2
3
4
5
6
7
8
9
10
11
12
| spring:
datasource:
driver-class-name: com.mysql.cj.jdbc.Driver
url: jdbc:mysql://localhost:3306/toutiaodb
username: root
password: 123456
type: com.alibaba.druid.pool.DruidDataSource
druid:
initial-size: 5
min-idle: 5
max-wait: 30000
max-active: 20
|
依赖信息
1
2
3
4
5
| <dependency>
<groupId>com.alibaba</groupId>
<artifactId>druid-spring-boot-starter</artifactId>
<version>1.1.23</version>
</dependency>
|
Mybatis-plus分页配置
1
2
3
4
5
6
7
8
9
10
11
12
13
14
15
16
17
18
19
|
@Configuration
@MapperScan("org.yunfree.toutiao202302.mapper")
public class MybatisPlusConfig {
@Bean
public MybatisPlusInterceptor mybatisPlusInterceptor() {
MybatisPlusInterceptor interceptor = new MybatisPlusInterceptor();
interceptor.addInnerInterceptor(new PaginationInnerInterceptor(DbType.H2));
return interceptor;
}
}
|
SpringBoot全局跨域
1
2
3
4
5
6
7
8
9
10
11
12
13
14
15
16
|
@Configuration
public class CorsConfig implements WebMvcConfigurer {
@Override
public void addCorsMappings(CorsRegistry registry) {
registry.addMapping("/**")
.allowCredentials(true)
.allowedOriginPatterns("*")
.allowedMethods(new String[]{"GET", "POST", "PUT", "DELETE"})
.allowedHeaders("*")
.exposedHeaders("*");
}
}
|
2023-3-13


